Monday, August 15, 2011

Free Hand Flowers Look-alike

There's the final look:
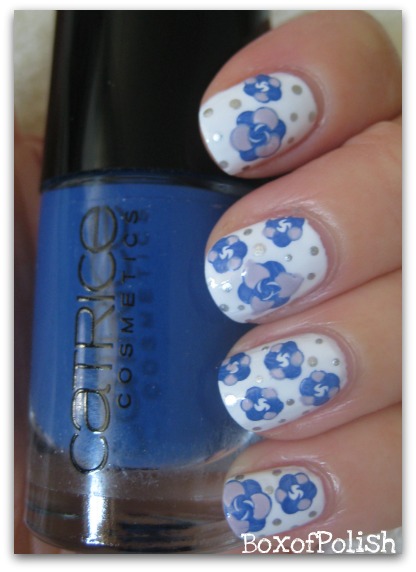
What do you think? It may not be a strong look-alike, but these flowers do remind me of the free hand painted ones. I started with 3 coats of Essence Ahoy! for the white base. Then I stamped the flower design of Konad image plate M83 with Catrice no. 410 Pool Party At Night to create the dark purple flowers.
Now it's the turn for the free-hand-look-alike step. I used Essence Colour & Go no. 42 Dress For A Moment to change the white petals into beautiful lilac ones. This step may seem simple, but I don't have a steady hand, so the flower on my middle finger blossomed into a slightly mutated one.
To brighten things up, I randomly made dots with China Glaze Millennium. I think I overdid the dotting on the middle finger, blame it on the mutated flower... At last, I used Konad Topcoat for a glossy seal. All the colours used above are totally optional, I would definitely try other combinations with this design as well.

Have a great one!!!

Tuesday, August 9, 2011

In The Mood For Fall

It's still summer here, but I am already in the mood for a fall mani. The cause of this crazy mood change has to do with the launch of the 2011 fall collection of both OPI and China Glaze. The moment I saw the swatches of OPI 'Touring America' and CG 'Metro' collections, I just wanted to use similar colours to create something.


These are the colours/ tools that I used:

~ H&M Spring Nails Set: White
~ H&M Spring Nails Set: Brown
~ Etude House Petite Darling Nails: GR607 Sand Green
~ Dotting tool (you can also use a toothpick)
~ Konad image plate M77
~ Konad special polish: White

I have already swatched all four colours of the H&M Spring Nails Set in a previous post. Who would have thought that these tiny beauties are suited for fall mani's as well =] As for the other beauty, Etude House Sand Green, this is the first time to swatch it, although it's been in my stash for a while now. Sand Green (don't quite get the name) is a dark sheer green polish that reaches opacity with two coats. Just like the other Petite Darlings, the application was easy and smooth. I really like the way this polish blended with H&M White; it looks like a green gradient.

This mani is very easy. The method for the index, middle and pink is the same. I simply layered thick coats of the brown, white and green polishes first. While the polish is still wet, I used a dotting tool to make stripes beginning at the tip of the finger to the cuticle. Due to the thick layers, the dry time is a bit longer than usual. As for the accent nail, I used Konad M77 along with Konad special White polish to stamp the feathers.

Have a wonderful one!!!

Tuesday, August 2, 2011

Sea Sparkle

Today's mani has colours that reminds me of the sea.

There are two coats of KIKO no. 341 Verde Cobalto. It was really hard to capture the accurate colour of Verde Cobalto, because it leans more to green/ teal in real life. So I tried to change the colour of the picture above in order to show you how it really looks like. The application went very smooth thanks to the fine brush and the layers dried quite fast. 

Then I layered two coats of CND Effects no. 559 Gold Sparkle over it. Gold Sparkle is the very first bottle of CND in my tiny collection. I really like the formula and the brush of this CND polish. The shape of the bottle is also a bit different than the usual round ones that I own. Gold Sparkle is filled with golden glitters and flakies and it has an extremely  glossy finish. I am totally in love with 'effect' nail polishes as they can give your mani an extra something special =]

For the accent nail, I used Konad image plate M76, which is one of my favourite image plates at the moment and Konad special polish in white.

Have a wonderful one!!!

Tuesday, July 26, 2011

Ahoy!

From the latest Essence's TE '50's Girls Reloaded', I bring you: No. 01 Ahoy!

Ahoy! is a simple white polish that requires at least 2 coats to be opaque. The application was less smooth compared to You're A Heartbreaker! due to the thickness of the polish. Furthermore, each layer resulted in visible brush strokes, but a layer of topcoat solved the problem.

I used 2 coats of Ahoy! and added some blue and gold glitters. As for the tiny ribbon on my ring and index finger, I used Konad image plate M03 and Konad special nail polish in black. Finally, I used a layer of topcoat to seal everything.

Have a wonderful one!!!

Tuesday, July 19, 2011

You're A Heartbreaker!

Essence has recently launched a Trend Edition that allows you to travel back to the 50's. With this newest collection, you can create the ultimate retro-look. The 50's Girls Reloaded Collection consists of eyeshadow, eyeshadow brush, eye pencil, 2 lipstick, translucent loose powder and 5 nail polishes. Just like any other TE, the nail polishes are the ones I want =] When I looked at the promotion pictures, I thought that the nail polishes where all transparent, so the moment I saw them in the store, I was quite surprised in a positive way.
The one swatched above is: no. 05 You're A Heartbreaker. It is a steel grey/ blue with beautiful green and purple shimmer. At first sight, you'll think that it's just silver shimmer, but if you look closely, then you'll see they actually shine green and purple. I took the picture above under artificial light at night. It does not show the exact colour, so when the clouds were gone for a second during the day, I took another one:
Please do ignore the tip wear, I did not pay enough attention to my mani during work. You're A Heartbreaker and the other 4 nail polishes of this TE collection comes in full sized bottles which contain 15ml! The application was smooth and 2 coats were sufficient to reach opacity. I used Konad image plate M03 and white Konad special stamping polish to stamp the stars.

What do you think of these Essence TE nail polishes?

Have a great one!!!

Sunday, July 10, 2011

Over The Rainbow

A few months ago, I found out that there is a nail-art related application for Android phones named: NailCatalog.


When you open NailCatalog, you'll find a huge collection of manicures sorted according to base (one color, gradient, french or other) or color (pink, blue, purple, white/beige, yellow, green, gold, orange/brown, red, black, colorful and silver). The manicures are created by various nail salon's in Japan. So if you click on one design, you get to see a larger image of the mani and information of the nail salon that created it.

Today's mani is inspired by the above mani:

I used 3 coats of KIKO no. 204 to draw the clouds. KIKO no. 204 belongs to KIKO's French Manicure line, because it's a milky white sheer. I could have picked a white cream instead, but I wanted to create that dreamy feel to the clouds...not really sure I've managed to do so =S

As for the rainbow, I used Dolly Wink no. 03 (pink), no. 07 (lilac) and no. 09 (green) and Models Own Lemon Meringue.

Have a nice one!!!  

Saturday, July 2, 2011

The Paradise Sunset

Summertime!!! Let's sit back and relax at the beach or anywhere else where the sun shines brightly ^^

Since it is summer, I picked a colour which I usually do not wear: orange. I think it doesn't look good with my skin colour, but who cares...it's a nice colour to wear during this period of the year.


At first, I painted the whole nail of my pink, but I didn't like it that much, so I continued my other nails with a gradient...LOL! I used ESTESSiMO TiNS no. 44 The Paradise Sunset (fabulous name!!!). It's a sheer orange with squared glitters that shines the colours: blue, green and orange. The formula was a bit thick as result of the many glitters, but it was easy to work with.


The process of the gradient contains 3 steps: first layer 3/4 of the nail, then 1/2 of the nail and finally just 1/4 of the nail (nail tip). I used Pa nail color A03 to smoothen out the three layers. I love to use Pa A03 as a glitter topcoat for the nice shimmer finish.


Finally I used some 3D nail stickers that I bought from the Born Pretty Store to 'decorate' the whole look.

Happy Summer Holidays!

Have a great one!!!